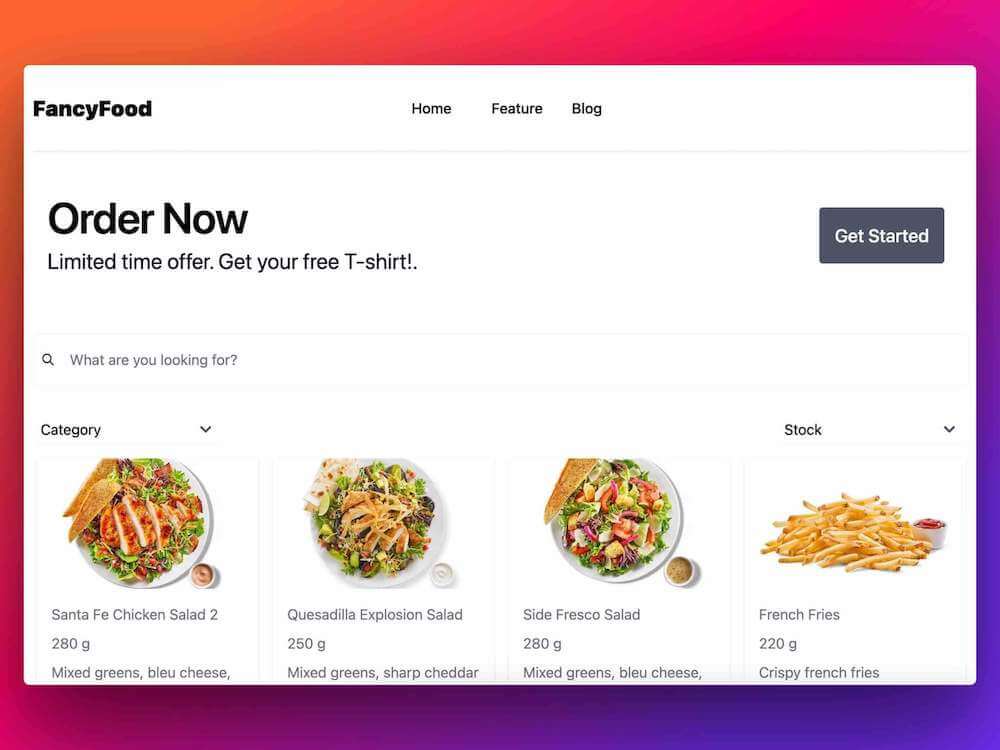
It's never been easier to build a business of your own:
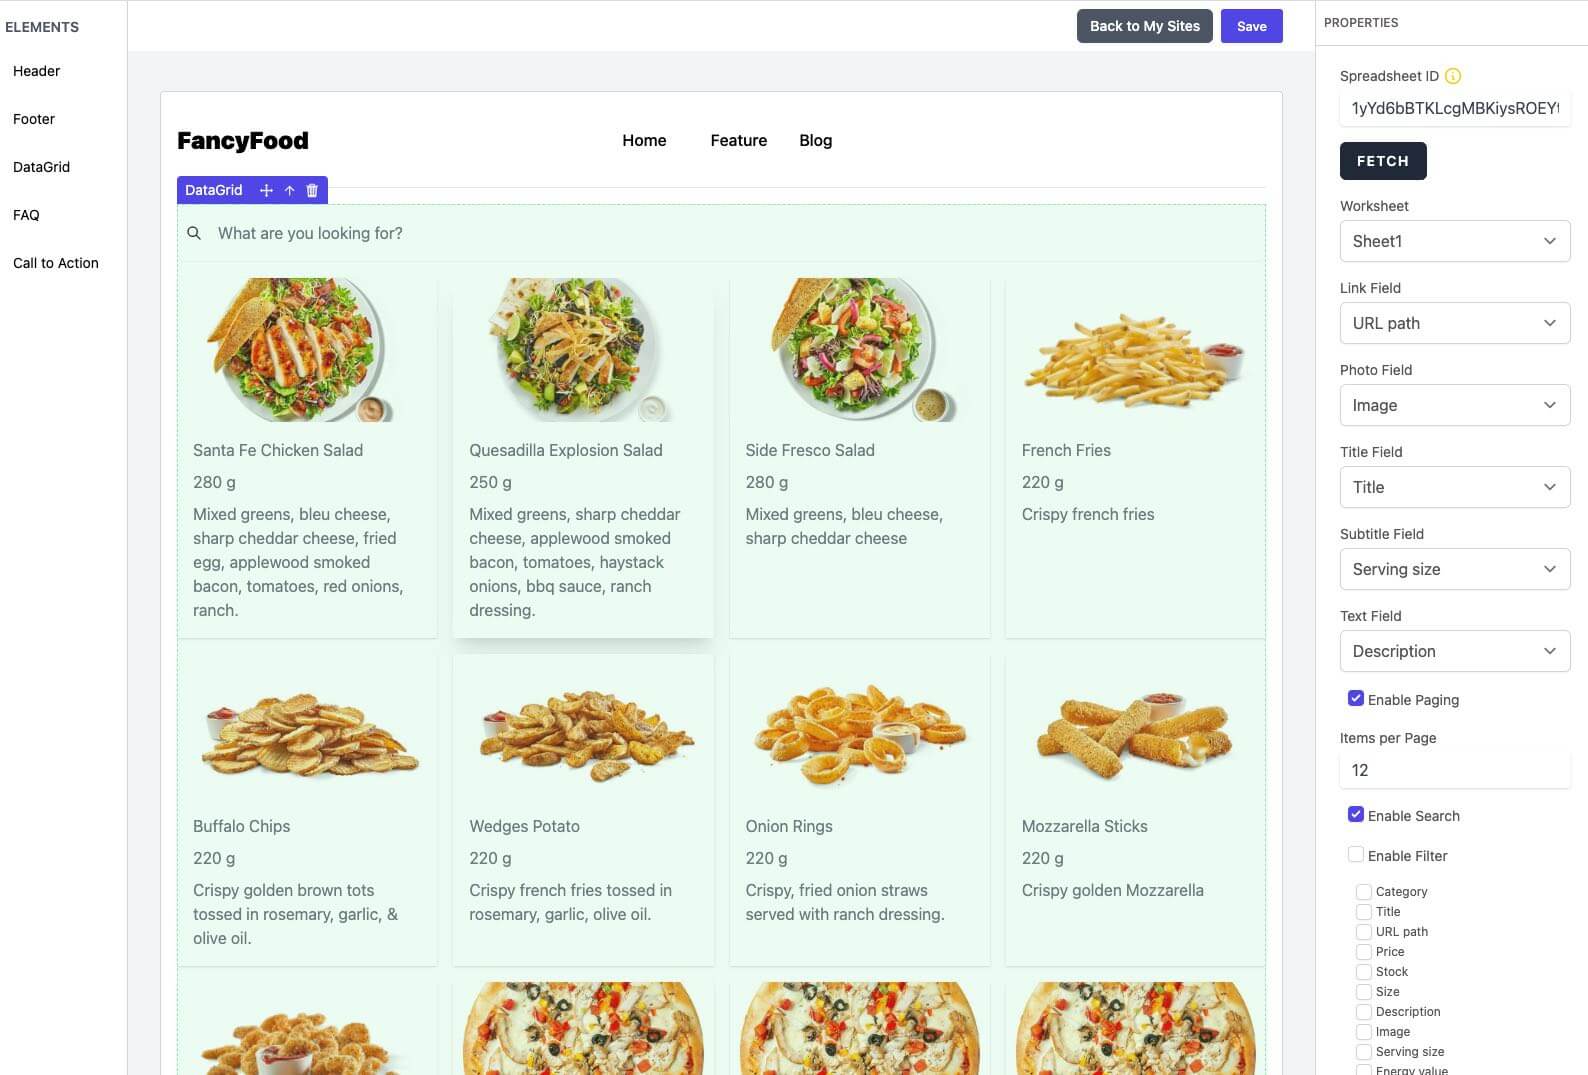
By using a page builder, we can clearly separate your design from your Google Sheets data. This makes SiteFast perfect for people who do not want to mix design with data. You control your data in your Google Sheets and make your design from the page builder. It is clean and simple!
SiteFast fetches data from your Google Sheets data and you choose what and how you want to display them. You do not have to copy any Google Sheets templates from us unlike some other solutions. We believe that you shall not need to edit any of your Google Sheets structure in order to build a site.
SiteFast keeps the page in sync with your Google Sheets. This means when you modify your Google Sheets data. SiteFast will update its content automatically to keep the data in sync.
If you are already using Wix, WordPress, Webflow, or any other custom site. You can easily embed your SiteFast page into your existing site using the embed code.
Click the "+" sign to create a SiteFast page.
Drag and drop a table
element to your page.
Configure the table element with your Google Sheets ID and choose the fields you want to display. You can also define pagination, search, and filters for the table.
Click the share icon on the top left of the site card:
Copy the embeddable code and we are going to use it next.
Click + ADD BLOCK
on your Squarespace page;
Select Embed
element:
Click Code Snippet
tab and select Embed data
:
Paste SiteFast embed code we have copied previously to the text area:
Click Done
on the top left corner of your page to save your changes.
Now you should be able to see your SiteFast page being displayed in your Squarespace page.
If you find the width does not fit, you can adjust the width of the Embed
element by dragging click its right border to expand it:
If you find the height does not fit, you can manually adjust the SiteFast embed code by explicitly setting a CSS height:
That is all. You have successfully embedded a Google Sheet to your Squarespace page.
Click the "+" sign to create a SiteFast page.
Drag and drop a table
element to your page.
Configure the table element with your Google Sheets ID and choose the fields you want to display. You can also define pagination, search, and filters for the table.
Click the share icon on the top left of the site card:
Copy the embeddable code and we are going to use it next.
Click the setting icon of your Webflow page:
Scroll to the bottom of it until you see Custom Code
:
Paste the SiteFast embed code in the body section of your Webflow page:
That is all. You have successfully embedded a Google Sheet to your Webflow page.
Click the "+" sign to create a SiteFast page.
Drag and drop a table
element to your page.
Configure the table element with your Google Sheets ID and choose the fields you want to display. You can also define pagination, search, and filters for the table.
Click the share icon on the top left of the site card:
Copy the embeddable code and we are going to use it next.
Click on Embed Code
, then drag and drop the code box to a place on your
page.
Click the Click to set custom HTML
box:
Click Edit Custom HTML
and paste SiteFast embed code we have previously
copied into the box.
Click outside of the code box to save your changes.
That is all. You have successfully embedded a Google Sheet to your Weebly page.
Click the "+" sign to create a SiteFast page.
Drag and drop a table
element to your page.
Configure the table element with your Google Sheets ID and choose the fields you want to display. You can also define pagination, search, and filters for the table.
Click the share icon on the top left of the site card:
Copy the embeddable code and we are going to use it next.
Click + Add Element
and </> Embed
to create a new Embed element:
Set Type to Code. Paste SiteFast embed code to Code.
Click Publish Changes
:
That is all. You have successfully embedded a Google Sheet to your Carrd page.
If you want to share your Google sheet with others, you need to make sure that they are allowed to see it. You can do this by enabling the "Make this sheet public" option. Once this option is enabled, you can share your spreadsheet with people and groups. However, keep in mind that you cannot edit the sheet if others can view or edit it. You can change this option by changing the settings in the "Share with people and groups" dialog.
To share your Google Sheet, you need to give everyone in the shared group editing rights. This permission is usually referred to as "editor" permission. This is an excellent option if you work on a project with your team using a Google Drive. You will also want to track any changes that are made in the sheet, as this will make collaboration much easier. The "Share" option is available in the top right corner of your Google Sheet.
If you want to share a spreadsheet with colleagues, friends, or even clients, you can use Google Drive. It's integrated with Google Workspace and includes an API that allows developers to access data. This allows you to create pivot tables and charts in a Google Sheet. You can also publish the file as a web page or a print-ready manuscript. You can also make your Google Drive folder public. This makes it easy to share your spreadsheet with others, which is great for collaborating on projects with a team.
When you need to share a document with others, you may want to upload the Excel file into Google Sheets. This feature will allow other people to easily view and edit your work, and it allows you to view and comment on other people's spreadsheets. It is easy to upload Excel files to Google Sheets and vice versa. Here are the steps to upload an Excel file into Google Sheets. This is the easiest way to share a document with other people.
First, you must open the file in Excel. Once you have opened the file, you should notice the 'x' icon on the filename. This icon is a symbol that shows that the file is an Excel file. When you see it in Google Sheets, it means that you have successfully uploaded the file into Google Sheets. However, you must check the data in your spreadsheet before you delete it from Google Sheets.
Once you have successfully uploaded your Excel file into Google Sheets, you can work on it. There are many ways to import an Excel file into Google Sheets. Depending on the file size, you can choose to upload an Excel file from multiple locations. You can also send a copy of the file to yourself. If you want to share your spreadsheet with someone, you can share it through email. Alternatively, you can choose to upload an Excel file from a desktop computer.
To add multiple columns to a Google Sheets spreadsheet, you can use the Insert menu. This menu is located on the top-right corner of the spreadsheet. The first step is to highlight a column header and right-click on it. From there, you can select the option "Insert a new column". You can then choose to insert one column left or right. This will add a new column to the spreadsheet.
There are several ways to add multiple columns to a Google Sheets spreadsheet. The first way is to click on the cell in which you want to add a new column and then highlight the number of columns you'd like. Once you've done this, click OK. If you'd like to add more than one column, repeat these steps. You'll see a new column with a row header.
Another way to add multiple columns to a Google Sheets spreadsheet is to click on a group of cells and choose "Insert multiple columns." This option will automatically insert a column between the first column. This method is useful if you need to insert multiple columns in a single spreadsheet. Just be sure to choose the correct number when you're adding multiple columns. You may need to change the number of columns when modifying the row height.
If you'd like to combine two or more columns in a Google Sheets sheet, you need to make sure that they are separated by apostrophes. You can then combine the columns using the ARRAYFORMULA function. To do this, you can use the "&" operator or "ampersand".
If you want to share a Google Sheet with multiple users, you will need to change its permissions. By changing the access permissions, you will be able to limit who can view, edit, and print the spreadsheet. In addition, you can restrict who can comment or print the sheet. This is especially useful if you want to share a spreadsheet with a group of people. You can change the access permissions for each user in the "Share with people and groups" dialog. You can also make someone the owner of the sheet and set their permissions. This will give them complete control over sharing and editing permissions. They can also delete access if they want to.
Once you've made a spreadsheet editable by multiple users, you can give them edit and view rights to specific ranges and cells. If you want, you can also restrict editing permissions for individual users. Make sure that you assign different permissions for each user to ensure that you're giving each user the proper access. You can also give them the ability to add new users. Make sure that they have a Google account.
You can also make a Google Sheet editable by multiple users by sharing it. You can share a Google Sheet with multiple users, which makes it a great way to collaborate with colleagues. All you need to do is open the spreadsheet you want to share and click on the Share icon. You can then enter the email addresses of the people who can access the document. When sharing it with others, you can choose whether they can view it only or edit and comment on it.
Using the integrated Google Forms and Google Sheets, you can quickly and easily collect responses to your form. Once you've set up this integration, your responses should appear immediately in your spreadsheet. You'll even get an extra column with the time that the response was submitted. Setting up a Google Form and Google Sheet integration only takes a few minutes. Just follow these simple steps to start collecting responses. The end result will be an automated process that saves you time and effort.
First, you need to create a new spreadsheet or choose an existing one. You can choose the spreadsheet from your Google account or create a new one. Once you've set up the new spreadsheet, select your form from the left menu. You can even select an existing worksheet and create a new one. The form will create a column in Google Sheets with the fields you added. By default, the 'Submission ID' column is selected, but you can select a field to make it visible or hidden.
Next, click the Google Sheets icon on the form. Your responses should now be sent to the sheet. If they are not, click the three-dot icon in the response pane. You can also choose to unlink the connection. You'll receive a warning message before you do so. Ultimately, you'll want to make sure that you've selected the correct settings and that your Google Forms are interacting with each other.
Connecting a Google Form and a Google Sheet is a great way to collect data. Google Forms is free to use and includes many features. It is also compatible with Google Sheets and will automatically save the data you collect. As you can see, the process saves you time and gives you 100% accuracy. You can even create quizzes and use them to test students and evaluate their abilities. This way, you can easily get the data you need with a Google Sheet and a Google Form.
There are also lots of add-ons available for Google Sheets. You can set up notifications to notify you when a form is filled out. These notifications can be as simple as an email notification, or you can choose to receive more detailed notifications. You can also set up email notifications that alert you when your form is modified. This will let you be notified immediately if there is a problem. Once you set up the integration, you will have a ready-made tool for transferring data from one form to another.
After you've set up your Google Forms, you can use this integration to sync responses to your spreadsheet. You'll also have access to the data collected in your spreadsheet. The best thing about using Google Forms and Google Sheets together is that they're designed to work seamlessly with each other. If you've created a Google Form, then you should be able to link it to a Google Sheet without a hitch.
You may have heard about the option to prevent others from copying your Google Sheet, but do you know how it works? You can use this option to stop people from cloning your spreadsheet, but the disadvantage is that it can take up a lot of time and cause you to lose valuable rows. In order to prevent someone from copying your Google Sheet, you must first open it in the browser and hold the Ctrl key to select multiple rows. Then, you can right click and select 'copy selected rows'. Earlier, the solution to this problem was to paste special values, but this option has become obsolete with Google Sheets' updates.
This option is not as effective as preventing people from copying your sheet, because it will prevent people from editing your spreadsheet without your permission. However, it does prevent someone from copying your sheet when it is protected. To prevent this from happening, you can use a single webapp that hides the logic of the spreadsheet. Then, you can use Ctrl. + Shift+C to forcely copy a protected Google Sheet. Or, you can also copy it by using the 'Copy G Sheet' link.
To prevent someone from copying your spreadsheet, you can set up editing permissions. To set these permissions, go to the sheet's sheet tab. Choose Protect sheet. This feature will prevent someone from copying your Google Sheet if they are the owner. Protected sheets still allow others to view the data, but they can't change it. This feature is also good for keeping your data safe when you don't want someone else to copy it.
You can use Google Sheets for many purposes, including creating landing pages, collecting surveys, and tracking social media analytics. It's easy to learn, and it can do nearly anything - making it the perfect foundation for your website.
Advantage of Google Sheets is its collaboration capabilities. If a team needs to edit a document, they can collaborate on it without worrying about downloading software and wasting HD space. They can also see what others are editing in real time, saving time and energy. In addition, everyone can edit the same spreadsheet. Just make sure that the users you invite to edit it have the appropriate permissions. This is by default private, but you can also give them access.
The most straightforward way to embed Google Sheet into a website using an iframe, check out the tutorial here.
However as iframe has its shortcoming such as security reason, you might not want people to see your Google Sheets directly. You can embed a Google Sheet into a website using one of the many no-code spreadsheet-to-site tools available online. With just a few clicks, you can embed a Google Sheet on your website and start analyzing your statistics right away:
You can use the API key of Google Sheets to scrape data from any website to your spreadsheet. To find your API key, click the "profile" icon in the toolbar and select "Account." Then, in your spreadsheet formula, replace PROJECT_TOKEN with your project token and API_KEY with your account API key. After scraping the data, your spreadsheet will be auto-populated.
You've probably used a tool such as Simplescraper to scrape data from websites and export it to Google Sheets. While you can use other similar tools, Simplescraper is unique among them in that it can save the scraped results automatically to Google Sheets. You can connect Simplescraper to your Google account and then scrape data from any website. To use Simplescraper, simply visit the corresponding Google Drive page and click the 'Connect' button. Once you have done that, Simplescraper will create a sheet on your Google account with the name of your recipe.
Once you've set up the Byteline script, you're ready to export the data that you need to Google Sheets. To do this, you'll need to add the Google Sheets - Insert All node to your script. Next, configure it with the Spreadsheet Id and Sheet Name you'd like to import. Be sure to check the box for Clear values from spreadsheet if you want to remove any existing data. Once you've completed the configuration, you can deploy your flow. Then, all you have to do is view the data your Byteline script has extracted.
If you're looking for a Google Sheets Add-on that will help you connect to over 21 data sources, then you've come to the right place. KPIBees connects to more than twenty different data sources, including websites, and allows you to write custom queries in spreadsheet cells. You can also set refresh triggers for data, receive updates via email and Slack, and even share your data with others without giving them access to your database.
There are many ways to import data into Google Sheets, but if you want to extract specific information from a website, you may want to use XPath-query. IMPORTXML is a formula function that allows you to import XML from various sources. You can import data from CSV, TSV, RSS, and ATOM XML feeds. When using IMPORTXML, you can also reference a url by adding the url to the formula. XPath-query is also a function that can be used to scrape data from a website, but it is best used with caution.
If you're looking to extract data from websites, you may be interested in learning how web scraping works. A company known for its web scraping services, HiQ, crawls public websites and extracts data. The company provides a step-by-step guide to web scraping, including examples from an EventBrite page. You can also use the ImportXML function to extract specific data points.
With the introduction of Simplescraper, Google users can now export their scraped data directly to Google Sheets. It is simple to use, with just a few clicks. To get started, visit the Simplescraper website and follow the instructions to connect your spreadsheet. Once connected, you can begin scraping data from any website. You can also use Simplescraper's integration with Google Sheets to manage your scraped data.
You've heard of web scraping, but you don't know how to go about executing it on your own. Scraping data from a website is a complex process that requires knowledge of XML and Python. You'll find numerous tutorials on this topic online, but none will be the same. Some tutorials are very basic, while others feature more complex coding structures. To begin, you need to check that the website you're scraping allows data extraction. There are websites that have protective elements that prevent them from allowing their data to be scraped.
HiQ Labs Inc., a data analytics company, started scraping data from LinkedIn in 2012. It later provided its clients with "people analytics" that they can use to make better hiring decisions. Its products included a tool that ranked employees according to their skills and sensitivity to outside recruiters, as well as a summary of employee skill levels. Both of these tools helped employers determine where they should focus their efforts to maximize internal advancement and minimize external recruitment.
You may be wondering how to connect Google Sheet to a website. This article will show you how. There are several options to connect a Google Sheet to a website. Among these options are the ability to publish the sheet automatically or manually. In this case, you'll have to set the option to "Automatically republish when changes are made".
The ImportXML function can be used to import data from any website. Essentially, this function will pull data from any XML field or metadata. You can even choose which data to import, making it easy for you to create an interactive website for your website. Once you have this option set up, you're ready to go! But, before you begin, make sure you know what you're doing before you get started!
After you've decided on the type of content you'd like to display, the next step is to choose a format. A table can be either an image or a PDF, but you can also embed a Google Sheet as an embedded PDF. However, it's easier to embed a Google Sheet if you have a single tab. If you want to embed the entire sheet, you can use the HTML code. Afterwards, you can copy and paste the embed code in your website.
If you don't feel confident writing code, try SiteFast, a no-code website builder for Google Sheets. SiteFast focuses on design, so it's important to have a strong design in your website. You can choose from multiple design templates and hundreds of variations of the same website. This saves you designer and developer time, which are vital if you're a startup. It is also important to understand that no-code website builders don't work without a CMS.